















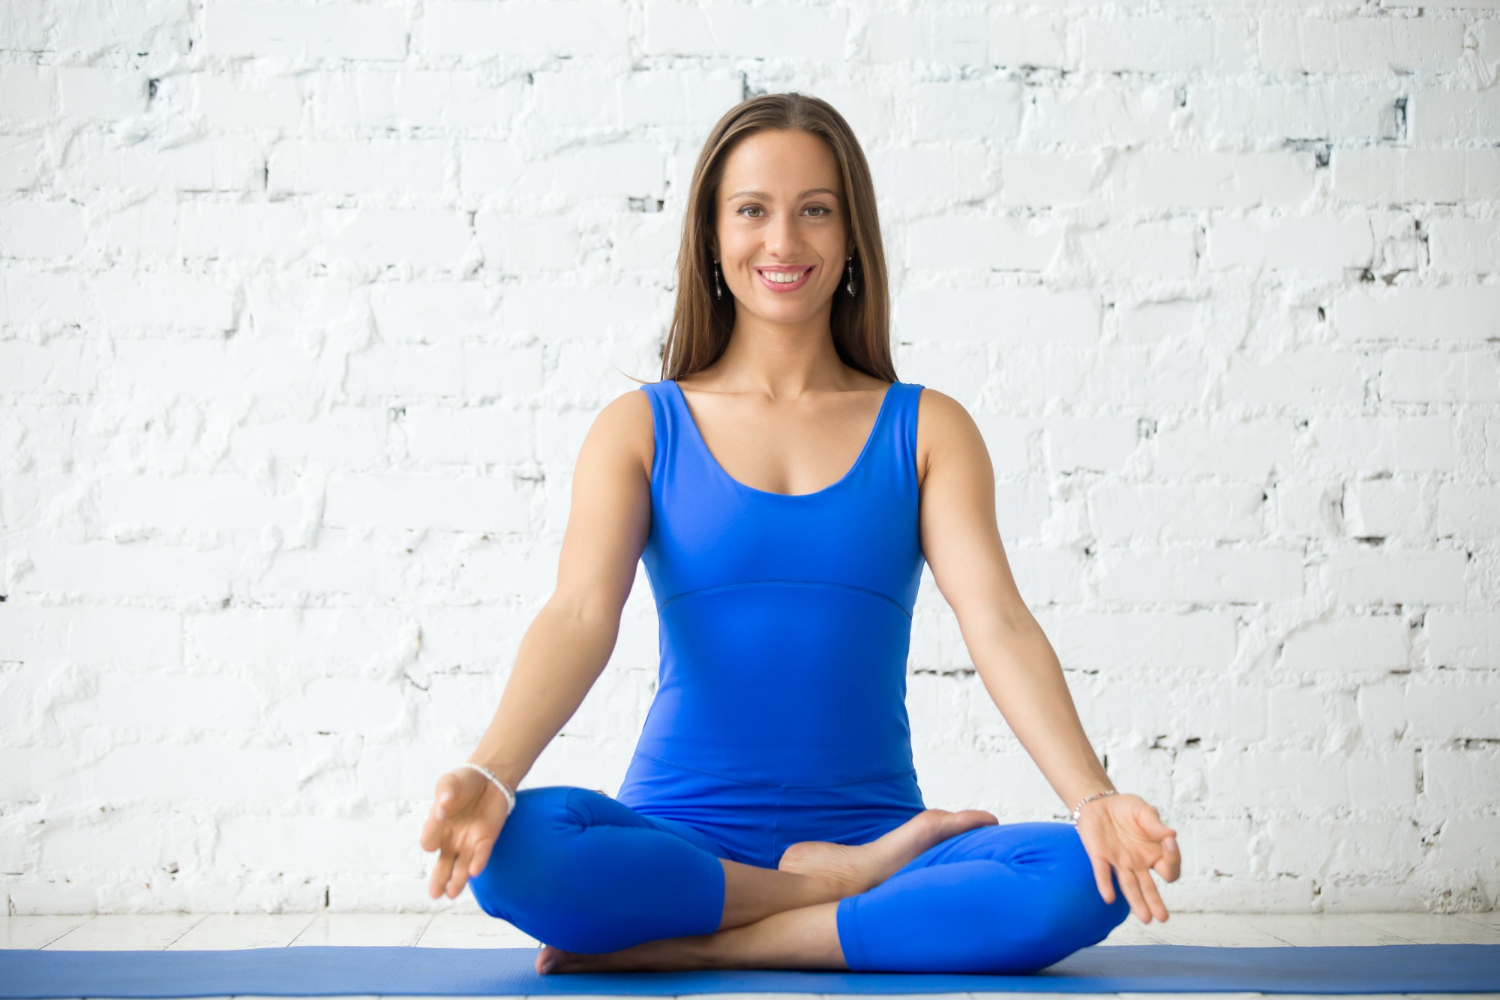
Garbha Pindasana, also known as the Embryo Pose, is an advanced seated yoga posture traditionally practiced within the Ashtanga Yoga system. The Sanskrit name is commonly translated as embryo in the womb, reflecting the compact shape formed by the body.
The pose is usually performed from Padmasana (Lotus Pose). The practitioner brings the arms through the space between the thighs and calves, bends the elbows, and brings the hands toward the face or head. In traditional practice, the body may be balanced on the buttocks while the practitioner gently rolls or rocks.
Garbha Pindasana combines several demanding elements:
- Hip external rotation
- Knee flexion
- Ankle mobility
- Core control
- Spinal flexion
- Balance
- Upper-body coordination
- Concentration
Because it requires a comfortable Lotus Pose as its foundation, Garbha Pindasana is generally not a beginner-level posture.
Related Stories
 9 Best Yoga Poses for Lumbar Spondylosis With Safety Tips
 Bug Yoga: Benefits, Poses, How to Do It & Safety
It is particularly important not to confuse the visual appearance of the pose with its actual requirements. The goal is not simply to make the body compact. Safe practice depends on having sufficient hip mobility so that the knees and ankles do not absorb excessive rotational stress.
There is currently very limited scientific research specifically examining Garbha Pindasana. Therefore, claims about its unique effects should be distinguished from research examining yoga as a broader practice. For example, systematic reviews suggest that yoga can influence balance and physical function, but those findings cannot be interpreted as proof that Garbha Pindasana itself produces the same effects.
Garbha Pindasana and Padmasana.
Understanding Lotus Pose is essential before learning Garbha Pindasana.
Padmasana places both feet onto the opposite thighs and requires substantial hip external rotation.

If the hips do not have sufficient mobility, practitioners may unintentionally compensate by rotating through the knees.
This is one of the most important safety considerations.

A person should not force the knees downward simply to achieve Lotus Pose.
If Padmasana is uncomfortable or unavailable, forcing Garbha Pindasana is not appropriate.
Instead, practitioners can develop the necessary hip mobility gradually or use preparatory variations.
Potential Benefits of Garbha Pindasana.
The following benefits are based primarily on the movement characteristics of the posture and broader yoga evidence, rather than clinical trials specifically testing Garbha Pindasana.
1. Challenges Balance.
Garbha Pindasana can require balancing the compact body on the sitting bones.
This creates a proprioceptive challenge because the practitioner must continually make small adjustments to maintain stability.
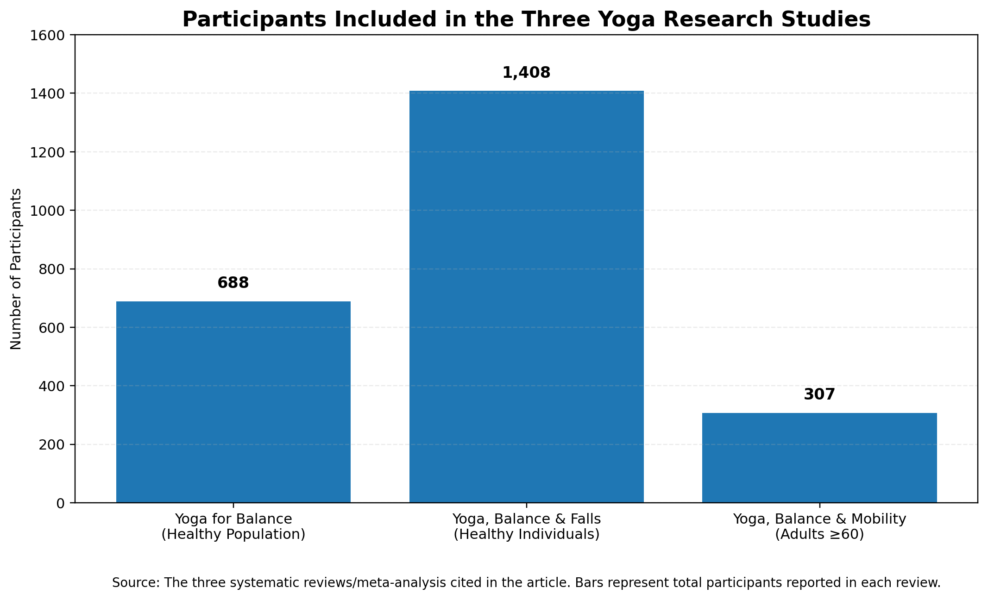
Research on yoga more generally provides some evidence for improvements in balance. A systematic review involving 15 studies and 688 healthy participants found that 11 studies reported positive findings in at least one balance outcome, although the authors highlighted variability in study quality and reporting.(1)
A newer systematic review of 18 randomized controlled trials involving 1,408 healthy participants also found low-certainty evidence that yoga can improve balance.(2),(3)
These findings support yoga as a balance-challenging activity, but they do not establish Garbha Pindasana as a treatment for balance disorders.
2. Develops Body Awareness.
Because the body is folded into a compact position, Garbha Pindasana requires awareness of multiple joints simultaneously.
The practitioner needs to monitor:
- Hip position
- Knee comfort
- Ankle position
- Spinal alignment
- Arm placement
- Weight distribution
- Breathing
This makes body awareness an important part of the practice.
3. Challenges Core Control.
Maintaining the compact position requires the trunk muscles to participate in stabilizing the body.
The abdominal muscles and deeper trunk stabilizers may contribute to maintaining the posture.
However, Garbha Pindasana should not be described as a replacement for conventional progressive core-strength training.
4. Requires Hip Mobility.
The pose requires substantial hip external rotation.
Practicing appropriate preparatory movements may help practitioners explore hip mobility over time.
However, the pose should not be used to force the hips into greater range.
A person’s natural hip structure can influence how comfortably they can achieve Lotus-based positions.
5. Challenges Coordination.
Garbha Pindasana involves coordinating the arms, legs and trunk at the same time.
Getting the arms through the legs can be particularly challenging for practitioners who are unfamiliar with the posture.
The movement therefore requires both mobility and coordination.
6. Encourages Concentration.
Advanced balance postures require attention.
If the practitioner becomes distracted, the body may lose its stable position.
Slow breathing and focused attention can make the practice more deliberate.
7. Develops Control Rather Than Just Flexibility.
A common misconception is that advanced yoga poses are primarily flexibility exercises.
Garbha Pindasana demonstrates why that is incomplete.
The practitioner needs enough mobility to enter the position, but also needs strength and control to maintain it.
8. May Complement a Broader Yoga Practice.
Garbha Pindasana can be included as one component of a larger practice involving:
- Mobility
- Strength
- Balance
- Breathing
- Relaxation
- Mindfulness
It should not be considered a standalone exercise for treating a medical condition.
What Muscles Does Garbha Pindasana Work?
Although Garbha Pindasana is not conventionally described as a strength-training exercise, several muscle groups participate.
Core.
The abdominal and trunk muscles help stabilize the torso.
Hip Muscles.
The hip rotators and surrounding muscles are involved because the posture requires significant hip positioning.
Gluteal Muscles.
The gluteal muscles contribute to hip positioning and stabilization.
Back Muscles.
The spinal muscles help control the trunk during entry and balance.
Shoulder and Arm Muscles.
The arms are actively positioned through the legs, requiring shoulder and elbow control.
It is more accurate to describe Garbha Pindasana as a mobility, coordination and balance posture with muscular involvement rather than as a conventional muscle-building exercise.
How to Do Garbha Pindasana Step by Step?
Because this is an advanced posture, beginners should first learn the preparatory movements.
Step 1: Begin in a Comfortable Seat.
Sit on a yoga mat.
Take a few slow breaths and allow the body to settle.
Step 2: Prepare for Lotus.
Bring the legs into a comfortable cross-legged position first.
If you already practice Padmasana comfortably, gradually move into Lotus.
Do not force the feet onto the thighs.
Step 3: Establish Padmasana.
Place one foot onto the opposite thigh and then the other foot onto the remaining thigh.
Both knees should remain comfortable.
If either knee experiences sharp pain, release the position.
Step 4: Prepare the Arms.
Once the legs are positioned, gently work one arm through the space between the thigh and calf.
Then bring the other arm through the opposite side.
Never force an arm through a restricted space.
Step 5: Bend the Elbows.
Bend the elbows so that the hands move upward toward the face.
The exact hand position can vary depending on flexibility and traditional instruction.
Step 6: Find Your Balance.
Shift the weight carefully toward the sitting bones.
Keep the movements controlled.
Step 7: Maintain Steady Breathing.
Take slow breaths.
Do not hold your breath to maintain the posture.
Step 8: Optional Gentle Rolling.
In traditional Ashtanga practice, Garbha Pindasana may involve controlled rolling or rocking.
This should only be attempted after mastering the static position.
Rolling should be gentle rather than forceful.
Step 9: Exit Slowly.
Release the arms first.
Carefully remove the legs from Lotus.
Never abruptly straighten or twist the knees after a prolonged Lotus position.
How Long Should You Hold Garbha Pindasana?
Beginners should not focus on long holds.
A few comfortable breaths may be sufficient when learning the posture.
More experienced practitioners may hold it longer according to their practice tradition.
The important factors are:
- Comfortable breathing
- No sharp pain
- Controlled positioning
- Stable balance
- No excessive pressure on the knees or ankles
Longer duration does not automatically mean better practice.
Garbha Pindasana for Beginners.
A full version of the pose is usually inappropriate as a first yoga posture.
A better progression is:
Stage 1: Easy Cross-Legged Seat.
Develop basic hip comfort.
Stage 2: Hip Mobility.
Practice gentle hip-opening movements without forcing range.
Stage 3: Half Lotus.
Explore a partial Lotus variation if comfortable.
Stage 4: Padmasana.
Only practice if the hips and knees tolerate the position comfortably.
Stage 5: Arm-Through-Legs Preparation.
Practice the arm movement without attempting the complete posture.
Stage 6: Supported Garbha Pindasana.
Use a teacher or appropriate support while learning the balance.
Stage 7: Full Pose.
Attempt the full posture only when the previous steps are comfortable.
Preparatory Poses for Garbha Pindasana.
A proper warm-up can make the practice more controlled.
Butterfly Pose.
A gentle Butterfly Pose can introduce hip movement.
Do not bounce aggressively.
Bound Angle Pose.
This can be used to explore comfortable hip mobility.
Half Lotus.
Practice only if the knee remains comfortable.
Easy Seated Twist.
A gentle seated movement can prepare the torso for controlled rotation.
Cat-Cow.
This provides gentle spinal movement before a more demanding seated posture.
Child’s Pose.
Useful as a gentle recovery position between challenging movements.
The goal of preparation is not to force flexibility, but to determine whether the body is ready for the movement.
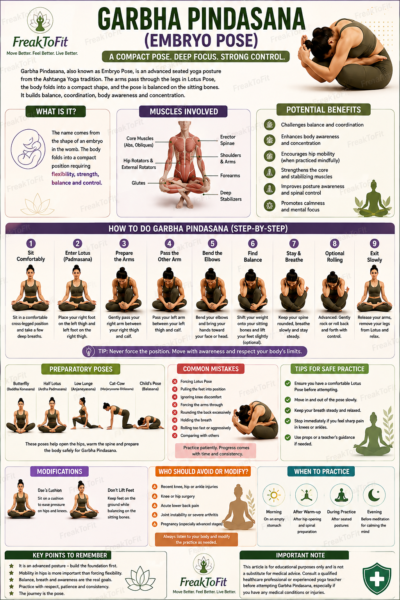
Common Mistakes in Garbha Pindasana.
1. Forcing Lotus Pose.
This is probably the most important mistake to avoid.
If the hips lack mobility, forcing the feet into Lotus can place unnecessary stress on the knees.
2. Pulling the Feet Into Position.
Using the hands to aggressively pull the feet onto the thighs can create excessive force.
Move gradually.
3. Ignoring Knee Pain.
Stretching sensations around the hips may be acceptable.
Sharp or localized knee pain is a reason to stop.
4. Forcing the Arms Through.
If there isn’t enough space between the legs, don’t push the arms through forcefully.
5. Rounding Aggressively.
Some spinal rounding is part of the compact shape, but excessive collapse should not be forced.
6. Holding the Breath.
Breathing should remain comfortable.
7. Rolling Too Forcefully.
If you practice the traditional rolling variation, use controlled movement.
Do not throw the body backward or forward.
8. Comparing Your Pose With Others.
Hip anatomy varies considerably.
Someone else’s Lotus position may not be appropriate for your body.
Garbha Pindasana and Knee Safety.
The knee is not designed to be the primary joint producing the large rotational movement required for Lotus.
Ideally, the hips should provide much of the required external rotation.
If hip mobility is limited, the knee may be exposed to unwanted rotational stress.
Therefore:
Never use the knee to force yourself deeper into Padmasana.
If you experience:
- Sharp knee pain
- Swelling
- Locking
- Instability
- Persistent discomfort
stop practicing and seek assessment from an appropriate healthcare professional.
Who Should Avoid or Modify Garbha Pindasana?
Extra caution is appropriate for people with:
- Recent knee injuries
- Meniscus injuries
- Knee surgery
- Hip surgery
- Significant hip pain
- Ankle injuries
- Severe lower-back problems
- Joint instability
- Acute inflammation
- Significant balance difficulties
People with a history of joint problems should not assume that an advanced yoga posture is automatically safe simply because it is a yoga exercise.
Individual assessment matters.
Garbha Pindasana During Pregnancy.
The traditional version may become uncomfortable or impractical during pregnancy because it involves deep hip positioning and compression of the body.
Pregnant practitioners should avoid forcing the abdomen into a compact position.
If practicing yoga during pregnancy, use pregnancy-appropriate modifications under the guidance of a qualified prenatal yoga instructor and healthcare professional.
Garbha Pindasana and Back Pain.
Garbha Pindasana involves substantial trunk flexion and compression.
It should not be presented as a treatment for back pain.
If you have persistent or severe back pain, particularly pain associated with numbness, weakness or symptoms traveling into the legs, obtain appropriate medical evaluation rather than attempting to correct the problem with an advanced yoga posture.
Does Garbha Pindasana Improve Digestion?
Traditional yoga sources sometimes associate compact or abdominally focused postures with digestive benefits.
However, there is insufficient direct clinical evidence to claim that Garbha Pindasana specifically improves digestion or treats digestive disorders.
This is an important E-E-A-T distinction.
It is reasonable to describe digestive effects as traditional claims, but they should not be presented as established medical facts.
Does Garbha Pindasana Reduce Belly Fat?
No.
Garbha Pindasana cannot selectively burn abdominal fat.
Spot reduction is not a reliable concept.
Reducing body fat depends on overall energy balance, nutrition, physical activity and other lifestyle factors.
If your goal is body composition, combine yoga with an appropriate overall exercise and nutrition plan.
Garbha Pindasana and Balance.
Balance is one of the more defensible physical characteristics of this posture.
The practitioner has to control the body’s center of mass while maintaining a compact position.
Research on yoga generally supports a potential relationship between yoga practice and improved balance. The 2025 systematic review of 18 randomized trials found low-certainty evidence of beneficial effects on balance, although the studies used different yoga styles, protocols and assessment methods.
This evidence should be interpreted carefully because Garbha Pindasana itself was not the intervention being tested.
Garbha Pindasana and Flexibility.
The posture requires substantial mobility at the hips and lower limbs.
Broader research also suggests that yoga can influence physical mobility. A 2024 systematic review examining yoga and spine and shoulder mobility included eight studies and reported potential improvements in spinal flexibility and mobility, while noting that effects differed according to population and intervention.
Again, this does not establish that Garbha Pindasana specifically increases flexibility.
The safest approach is to develop mobility progressively rather than forcing the posture.
Can Garbha Pindasana Improve Strength?
The posture requires muscular control, but it should not be considered a substitute for progressive resistance training.
Research on broader yoga programs has found improvements in physical qualities such as strength, flexibility and balance in some populations. For example, one 12-week non-randomized study involving physically active young men reported improvements in muscular strength, flexibility and balance following a yoga program.
However, a single yoga pose cannot be assumed to produce the same effects.
Garbha Pindasana vs Kukutasana.
Both postures are associated with advanced yoga practice and Lotus positioning, but their demands differ.
Garbha Pindasana creates a compact, folded shape with the arms passing through the legs.
Kukutasana involves lifting the body while the arms support the weight between the legs.
Kukutasana therefore generally places a greater strength demand on the arms and shoulders.
Both require comfortable Lotus positioning.
Garbha Pindasana vs Padmasana.
Padmasana is primarily a seated Lotus posture.
Garbha Pindasana builds upon that position by adding:
- Arm placement
- Greater trunk flexion
- Balance
- Coordination
- A more compact body position
Therefore, comfortable Padmasana is an important prerequisite for many traditional versions of Garbha Pindasana.
How Often Should You Practice?
There is no scientifically established ideal frequency specifically for Garbha Pindasana.
For an advanced posture, quality should take priority over repetition.
You might include it as part of a broader yoga practice rather than repeatedly entering and exiting the posture.
If your knees, hips or ankles remain sore after practice, reduce the intensity or frequency and reassess your technique.
A Safe Garbha Pindasana Practice Sequence.
A balanced sequence could look like this:
1. Cat-Cow – gentle spinal movement
2. Child’s Pose – relaxation
3. Butterfly Pose – hip mobility
4. Low Lunge – hip preparation
5. Half Lotus preparation – only if comfortable
6. Padmasana preparation
7. Garbha Pindasana preparation
8. Garbha Pindasana – short, controlled hold
9. Gentle seated release
10. Savasana – relaxation
This progression prepares the hips and spine rather than forcing them immediately into the final posture.
Frequently Asked Questions.
1. Is Garbha Pindasana suitable for beginners?
Generally, no. It is an advanced posture that requires substantial hip mobility and a comfortable Lotus position.
2. What is Garbha Pindasana also called?
It is commonly called Embryo Pose because of the compact shape formed by the body.
3. Is Garbha Pindasana an Ashtanga yoga pose?
Yes. It is traditionally associated with the Ashtanga Yoga practice, particularly the Primary Series.
4. Is Padmasana necessary for Garbha Pindasana?
Traditional versions generally use Lotus Pose as the foundation. If you cannot comfortably practice Padmasana, you should not force yourself into Garbha Pindasana.
5. Does Garbha Pindasana improve hip flexibility?
It requires substantial hip mobility, but there is insufficient direct evidence to say that the pose itself improves hip flexibility.
6. Does Garbha Pindasana strengthen the core?
It challenges trunk control and engages abdominal and stabilizing muscles, but it should not replace a complete core-strengthening program.
7. Can Garbha Pindasana hurt the knees?
It can create knee stress if Lotus is forced or if the hips lack sufficient mobility. Sharp knee pain should never be ignored.
8. Can I practice Garbha Pindasana if I have a meniscus injury?
It is generally inappropriate to attempt an advanced Lotus-based posture without individualized professional guidance if you have a meniscus injury or significant knee symptoms.
9. Does Garbha Pindasana help digestion?
Traditional yoga may associate certain compact postures with digestive effects, but there is not enough direct clinical evidence to establish that Garbha Pindasana improves digestion.
10. Does it reduce belly fat?
No. No individual yoga pose can selectively remove abdominal fat.
11. How long should I hold Garbha Pindasana?
Start with a few comfortable breaths. Longer holds should only be introduced when you can maintain the posture without pain or excessive strain.
12. Should I practice Garbha Pindasana every day?
Not necessarily. There is no established evidence-based daily requirement for this individual posture. Advanced poses should be practiced according to your experience, recovery and overall yoga program.
13. What should I do if I cannot get my arms through my legs?
Do not force them. Work on comfortable hip mobility and practice preparatory variations instead.
14. Can I roll in Garbha Pindasana?
Rolling is included in some traditional practices, particularly within Ashtanga Yoga. It should be attempted only after developing adequate control and under appropriate instruction.
15. Is Garbha Pindasana good for balance?
It challenges balance, and broader yoga research suggests potential improvements in balance. However, research has not established Garbha Pindasana itself as an effective treatment for balance problems.
Bottom Line.
Garbha Pindasana is an advanced, compact yoga posture that combines Lotus Pose, hip mobility, balance, coordination, core control and concentration. Its distinctive appearance can make it seem like a simple flexibility exercise, but safely performing it requires considerably more than flexibility.
The most important principle is never force Lotus Pose. Adequate hip mobility is essential, and attempting to compensate through the knees can increase injury risk.
Use preparatory poses, progress gradually and consider working with an experienced yoga teacher when learning the posture. Props and modified variations are not signs of failure—they are useful tools for developing control safely.
Research supports some potential benefits of yoga as a broader practice, particularly for balance and physical function, but there is not enough direct research to claim that Garbha Pindasana itself treats medical conditions or produces specific therapeutic effects.
Practice the posture for controlled movement, body awareness and skill development—not because a difficult-looking yoga pose is automatically more beneficial.
+3 Sources
FreakToFit has strict sourcing guidelines and relies on peer-reviewed studies, educational research institutes, and medical organizations. We avoid using tertiary references. You can learn more about how we ensure our content is accurate and up-to-date by reading our editorial policy.
- A systematic review of yoga for balance in a healthy population; https://pubmed.ncbi.nlm.nih.gov/24517304/
- Effect of yoga on balance, falls, and bone metabolism: a systematic review of randomized controlled trials in healthy individuals; https://pubmed.ncbi.nlm.nih.gov/39607489/
- Yoga-based exercise improves balance and mobility in people aged 60 and over: a systematic review and meta-analysis; https://pubmed.ncbi.nlm.nih.gov/26707903/